

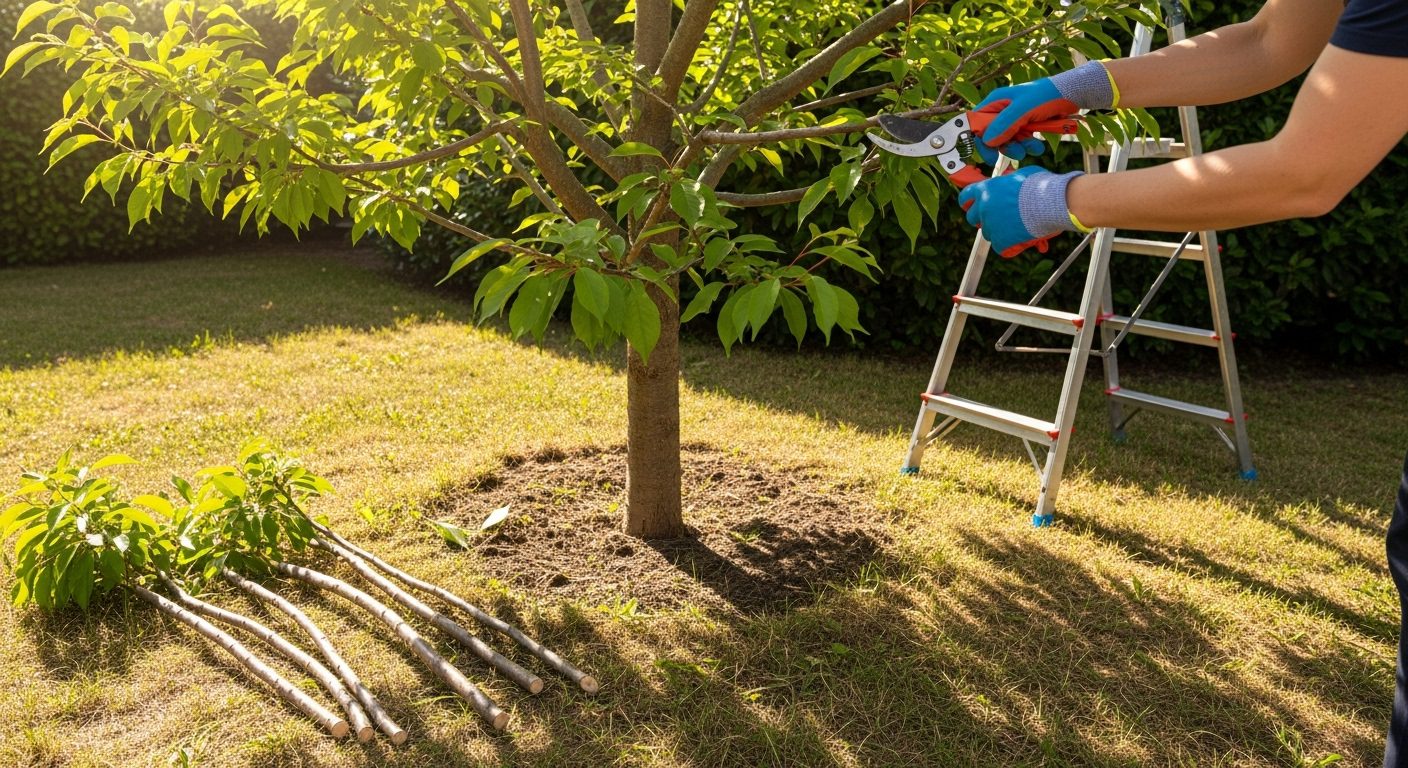
Learning how to prune a tree the right way is one of the highest-ROI skills a homeowner can pick up, and mid-summer 2026 is a smart window to study up before your dormant pruning season. After more than a decade of climbing ladders, sharpening blades, and learning from my share of mistakes, I can tell you this: pruning is mostly restraint. The goal is to remove the smallest amount of wood that solves the biggest problem, in a way the tree can actually seal off. Done well, pruning keeps your trees healthy, your property safer, and your yard looking intentional. Done badly, it can shorten a tree’s life by decades.
Tree pruning is the selective removal of branches to improve a tree’s health, structure, safety, or appearance. A proper cut is made just outside the branch collar, the swollen area where the branch meets the trunk or a parent limb. That collar contains specialized cells that wall off decay, so protecting it is the single most important rule in pruning. According to the U.S. Forest Service, well-maintained trees can lift a property’s value by up to 15%, while poorly pruned trees become liabilities that may eventually need expensive removal.
The fear of damaging a tree is the number one thing that keeps homeowners from picking up the shears. That fear is justified, because improper pruning causes more preventable tree decline than almost any other maintenance practice. The good news is that pruning follows a small number of repeatable rules, and once you internalize them, you can confidently work on most of the trees in your yard. This guide covers when to prune, which tools to use, the five rules of pruning, the three-cut method, the 4 Ds, common mistakes to avoid, species-specific timing, aftercare, and when it’s time to call a certified arborist.
When Is the Best Time to Prune Trees?
The best time to prune most deciduous trees is during dormancy, late winter to early spring, before buds break but after the hardest freezes have passed. Dormant pruning minimizes stress, lets you see the tree’s bare structure clearly, and reduces the spread of disease because most pathogens and insects are inactive in cold weather. The University of Minnesota Extension recommends late February through early April as the sweet spot for most shade trees in temperate climates.
During dormancy, a tree’s energy is stored in the roots and trunk, ready to fuel wound sealing and a flush of new growth once temperatures rise. Without leaves blocking your view, you can spot crossing limbs, included bark, dead wood, and weak attachments much more easily. I find pruning decisions become obvious when there’s nothing hiding the architecture. Frozen ground is an underrated bonus: it protects roots from compaction if you need to set up a ladder, a wheelbarrow, or a small chipper.
Dormant Season Pruning (Late Winter to Early Spring)
The ideal pruning window for most deciduous trees falls between late February and early April, just before new growth begins. Trees heal cuts quickly once growth resumes, and the absence of foliage makes it far easier to evaluate structure. In warmer zones (USDA zones 8 through 10), dormant pruning can shift earlier, often in January or February, while colder zones (zones 3 through 5) typically push into March or early April.
Without leaves in the way, you can clearly see the tree’s structure, making it easier to identify problem branches, crossing limbs, and areas needing thinning. I find that pruning decisions become much clearer when you can see the entire branch architecture. Frozen ground also protects roots from compaction if you need to use equipment around the tree.
Exceptions to Dormant Season Pruning
Not every tree follows the dormant-season rule. Spring-flowering trees like dogwoods, redbuds, magnolias, and ornamental cherries set their flower buds on the previous year’s wood. Pruning them in late winter removes this year’s blooms. Wait until flowers fade, then prune within a two-to-three-week window before summer growth kicks in.
Sap-bleeders like maple, birch, walnut, and butternut bleed heavily when pruned in late winter. The bleeding looks dramatic but rarely harms the tree, though it can be unsightly on white-barked birches. The New Mexico State University Extension recommends pruning these species in mid-summer, after leaves have hardened, to reduce sap flow and staining.
Oak trees require a hard seasonal rule in regions where oak wilt is present. The fungal pathogen spreads via sap beetles that are most active from April through July. Pruning oaks during those months can be a death sentence for the tree. In oak wilt zones, prune oaks only in the dormant window, ideally before March, or paint fresh wounds with wound dressing immediately as a barrier.
Dead, damaged, or hazardous branches should be removed immediately regardless of season. Storm damage, broken limbs, or branches threatening structures or power lines cannot wait for optimal timing. Growing-season removal just requires extra care to avoid tearing bark and to watch for disease-vector insects.
What Happens If You Prune at the Wrong Time?
Pruning at the wrong time rarely kills a tree outright, but it stresses the tree and can produce exactly the problems you’re trying to prevent. Summer pruning removes leafy surface area that produces energy through photosynthesis, weakening the tree and slowing growth. Fall pruning stimulates a flush of tender new shoots that won’t have time to harden off before winter, leading to frost damage and dieback the following spring.
I once pruned a client’s maple in early fall, thinking I was helping prepare it for winter. The tree responded by pushing out tender new shoots that were killed by the first hard frost. The following spring, that maple struggled with dieback and took two full growing seasons to recover. It taught me that respecting natural dormancy cycles is not a suggestion; it’s a hard rule for tree health.
Worst-case timing by tree type: avoid pruning oaks April through July in oak wilt zones; avoid pruning elms during the same window in Dutch elm disease zones; avoid heavy pruning of fruit trees in early winter when silver leaf and canker fungi are most active; and avoid heavy pruning of sap-bleeders in late winter if staining is a concern.
Species-Specific Pruning Timing at a Glance
Not every tree belongs on the same calendar. The table below summarizes the pruning window for the most common backyard species. Use it as a starting point, then adjust based on your climate zone, the tree’s age, and the season’s weather.
| Tree Type | Best Pruning Window | Notes |
|---|---|---|
| Most deciduous shade trees (oak, ash, honeylocust) | Late winter to early spring | Dormant season is ideal; clean structure visible |
| Spring-flowering (dogwood, redbud, magnolia) | Immediately after bloom | Pruning later removes next year’s flower buds |
| Sap-bleeders (maple, birch, walnut) | Mid-summer after leaf hardening | Reduces sap bleed; cosmetic concern, not fatal |
| Oak (in oak wilt zones) | Dormant only, before March | Avoid April-July; paint wounds immediately |
| Elm (in Dutch elm zones) | Dormant only | Avoid April-July beetle activity |
| Apple, pear | Late winter | Train young trees; maintain spur wood |
| Peach, cherry, plum (stone fruit) | Late winter or summer | Avoid wet, cool periods; risk of bacterial canker |
| Evergreens (spruce, pine, arborvitae) | Late spring to early summer | Light trimming only; avoid cutting into old wood |
Essential Tools and Equipment for Tree Pruning
The right tool makes the cut cleaner, the work safer, and the tree’s recovery faster. Quality pruners not only last longer, they crush less tissue and leave a smoother wound. Here’s what you actually need, broken down by branch size and pruning scope.
Basic Hand Tools for Small Branches
Bypass pruners (hand pruners) handle branches up to about 1 inch in diameter. The scissor-like action slices cleanly without crushing plant tissue, which matters more than most beginners realize. I use bypass pruners constantly for precision work, water sprout removal, and fruit tree thinning. Look for models with replaceable blades, a sap groove, and ergonomic grips that reduce hand fatigue during long sessions. Avoid anvil pruners for live wood; they crush.
Loppers extend your reach and leverage for branches 1 to 2 inches thick. The longer handles deliver more cutting power while keeping your hands clear of thorny growth. Bypass loppers work best for living branches, while anvil-style loppers handle dead wood effectively. I recommend a pair of telescoping loppers for versatility; being able to add 12 inches of reach mid-job saves a lot of ladder moves.
Pruning saws tackle branches 2 to 4 inches in diameter. A folding pruning saw fits in a tool belt, locks open for safety, and cuts on the pull stroke for better control. The curved blade keeps contact through the cut. For larger projects, a bow saw cuts faster but takes more storage space and is harder to maneuver aloft.
Specialized Tools for Larger Jobs
Pole pruners reach branches up to 15 feet high without setting a ladder. Manual rope-operated pole pruners work well for occasional use and cut branches up to about 1.25 inches thick. The mechanism takes a little practice but is much safer than climbing. For frequent high pruning, a powered pole saw saves time but adds noise, vibration, and the need for more serious personal protective equipment.
Chainsaws handle branches over 4 inches and major pruning projects. Unless you have formal training and the right PPE, leave large branch removal to a professional. The International Society of Arboriculture notes that chainsaw accidents send more than 36,000 people to emergency rooms every year. If you must use one, invest in chaps, a helmet with face screen and hearing protection, gloves, and a training course before your first cut.
Safety Equipment You Can’t Skip
Safety gear is not optional when pruning trees. I learned this the hard way when a falling limb grazed my shoulder, tore my shirt, and left a bruise that ached for two weeks. I never prune without proper protection anymore.
Safety glasses or goggles protect your eyes from falling debris, sawdust, and twigs. Get wrap-around styles that shield from the side. Work gloves prevent blisters and protect hands from thorns, rough bark, and accidental blade contact. Choose gloves that balance grip with dexterity.
Hard hats become essential when removing large branches or working under heavy canopies. Even modest limbs can cause real injury when they fall from height. Non-slip footwear provides stability on ladders and uneven ground. Steel-toed boots offer additional protection from dropped tools and branches.
For any work above shoulder height, use a stable ladder rated for your weight plus tools. Three points of contact (two hands and one foot, or two feet and one hand) should be maintained at all times. The Portland Bureau of Urban Forestry emphasizes that ladder accidents cause more pruning injuries than cutting tools themselves. Never lean a ladder against a branch you intend to cut.
Tool Maintenance for Better Results
Sharp, clean tools make pruning easier and healthier for trees. Dull blades tear rather than cut, creating ragged wounds that heal slowly and invite insects and pathogens. I sharpen my hand tools before each pruning session and clean them between trees to prevent disease spread.
Disinfect tools with 70% isopropyl alcohol or a 10% bleach solution when moving between trees, especially after cutting diseased wood. Oil moving parts regularly and store tools dry to prevent rust. Well-maintained tools can last decades. My favorite bypass pruners have served me for fifteen years and still cut like new.
The 5 Rules of Pruning (and the 1/2/3 Rule)
Before you cut a single branch, internalize the five rules of pruning. These five principles are what every arborist learns first, and they govern everything else in this guide. The 1/2/3 rule is a related shorthand for sizing cuts and a tree’s total canopy load.
The Five Rules of Pruning
1. Prune at the right time. Late winter to early spring for most deciduous trees; immediately after bloom for spring-flowering species; mid-summer for sap-bleeders; dormant only for oaks in wilt zones.
2. Use sharp, clean tools. Bypass pruners for live wood under 1 inch, loppers up to 2 inches, pruning saws above that. Disinfect between trees.
3. Cut at the right location, just outside the branch collar and branch bark ridge, never flush, and never leaving a long stub.
4. Remove the right amount. Never more than 25% of the living crown in a single year, and ideally under 15% for routine maintenance. Older trees at 75% or more of expected lifespan should be pruned at 10% or less per year.
5. Prune for the right reason. Safety hazards, dead or diseased wood, structural defects, and clear objectives like clearance over a roof or sidewalk. Avoid pruning just because you have shears in your hand.
What Is the 1/2/3 Rule of Pruning?
The 1/2/3 rule is a quick way to remember three numbers that govern how much you cut and how you size each cut. It bundles together the crown limit, the lateral-branch ratio, and the three-cut method.
1/3 max canopy: remove no more than one-third of the living canopy in any single pruning, and significantly less on mature or stressed trees. This is the upper limit; healthy maintenance pruning usually removes 10% to 15%.
1/2 to 1/3 lateral ratio: when you shorten a branch (a reduction cut), cut back to a lateral that is at least one-third to one-half the diameter of the branch you’re removing. Smaller laterals can’t support the wound, and the stub will die back.
3 cuts for large branches: any branch over about 2 inches thick should be removed with the three-cut method (undercut, removal cut, final collar cut) to prevent bark tearing down the trunk.
Step-by-Step Tree Pruning Process
Successful pruning starts with careful observation and planning. Before making any cuts, walk around the tree, study its structure, identify problems, and visualize the desired outcome. This preparation prevents over-pruning and ensures every cut serves a clear purpose. The five steps below mirror what a certified arborist does on every job, scaled to the homeowner level.
The 4 Ds of Pruning (the priorities checklist every arborist uses):
- Dead – brittle, barkless, no buds or leaves. Remove first; safety hazard and pest host.
- Damaged – broken, cracked, storm-torn, or scraped. Remove to prevent decay entry.
- Diseased – cankers, fungal conks, oozing sap, discolored bark. Remove below the infected area; disinfect tools.
- Deranged – poorly placed, crossing, rubbing, or structurally weak branches with narrow attachment angles. Remove to prevent future failure.
Walk through these four categories in order on every tree. If you stop after addressing the 4 Ds, you’ve usually done enough for that season.
Step 1: Assess Your Tree’s Condition
Walk completely around your tree, observing it from multiple angles and distances. Look for dead branches, which appear brittle and lack bark, buds, or green tissue under a thumbnail scratch. These are your first priority because they pose safety hazards and can harbor pests and diseases. Mark them mentally or with flagging tape for removal.
Identify crossing or rubbing branches that damage bark and create entry points for disease. When two branches compete for the same space, keep the stronger, better-positioned one and remove the weaker. Check for water sprouts (fast-growing vertical shoots from branches) and suckers (shoots from the base or roots) that divert energy from the main tree structure.
Note any branches growing toward the tree’s center, straight down, or at narrow angles to the trunk. These weak attachments are prone to breaking in storms. The University of Maryland Extension recommends removing branches that form angles less than about 30 degrees with the trunk, as those develop included bark that weakens the connection.
Step 2: Establish Your Pruning Priorities
Following a priority sequence prevents over-pruning and protects tree health. Start with the 4 Ds framework: Dead, Damaged, Diseased, and Deranged (poorly placed) branches. This systematic approach ensures you address safety and health issues before aesthetic concerns and keeps your total removal well under the 25% annual ceiling.
Never remove more than 25% of a tree’s living crown in a single year. The Morton Arboretum’s research shows that excessive pruning triggers stress responses, including water sprout proliferation and increased susceptibility to pests and diseases. For young trees, limit pruning to 15% to maintain vigorous growth.
For aging trees, apply the age-based threshold from r/arborists: if the tree has reached 75% or more of its expected lifespan for the species, prune 10% or less per year. A mature oak might live 200 years; once it passes 150, treat it gently.
Focus on structural pruning for trees under 20 years old. Establishing a strong central leader and well-spaced scaffold branches early prevents expensive corrective pruning later. Mature trees need less frequent pruning, primarily for deadwood removal and safety clearance.
Step 3: Make Proper Pruning Cuts
The location and angle of your cuts determine how well the tree heals. Every proper pruning cut should be made just outside the branch collar, the swollen area where the branch meets the trunk or parent branch. This collar contains specialized cells that seal wounds and prevent decay from entering the trunk. Cuts that damage or remove the collar can shorten a tree’s life by years.
For small branches (under 1 inch), make a single clean cut at a 45 to 60 degree angle just outside the collar. Support the branch with your free hand to prevent bark tearing. Cut close enough to avoid leaving a stub, but never cut flush with the trunk, which removes the collar and impairs healing.
The branch bark ridge, a raised line of bark between the branch and trunk, guides your cutting angle. Your cut should mirror this ridge’s angle on the opposite side of the branch. Penn State Extension research confirms that cuts made at this angle heal noticeably faster than flush cuts.
Step 4: Use the Three-Cut Method for Large Branches
Branches over 2 inches in diameter require the three-cut method to prevent bark tearing. I’ve seen too many trees with long bark strips peeled down the trunk from improper cutting, damage that takes years to heal and often leads to internal decay. The three-cut method is also the third leg of the 1/2/3 rule.
Cut 1 (Undercut): Make a shallow cut on the branch’s underside, 12 to 18 inches from the trunk. Cut about one-third of the way through the branch diameter. This prevents bark from tearing down the trunk when the branch falls.
Cut 2 (Removal cut): Move 2 to 3 inches beyond the undercut, toward the branch tip. Cut from the top, all the way through. The branch breaks free cleanly between the two cuts, leaving a manageable stub.
Cut 3 (Final collar cut): Remove the stub by cutting just outside the branch collar. Support the stub while cutting to ensure a clean, precise cut. This final cut determines healing success, so take your time to identify the collar correctly.
If a visual reference helps, search YouTube for “three-cut method” from Texas A&M Forest Service or Lowe’s; the technique is much easier to grasp when you can watch it once. The Portland Bureau of Urban Forestry publishes the same sequence on its pruning page if you prefer a static diagram.
Step 5: Address Water Sprouts and Suckers
Water sprouts and suckers rob energy from productive growth and create dense, weak wood. Remove them as soon as you notice them, ideally while they’re still soft enough to rub off by hand with a gloved thumb. Once they become woody, cut them at their base without leaving stubs. Suckers emerging from below the graft union on fruit trees should always go; they’re stealing energy from the desired cultivar.
Trees often produce water sprouts after heavy pruning or stress. If your tree develops numerous sprouts, it’s signaling that you’ve pruned too aggressively. Leave some sprouts temporarily to help the tree photosynthesize while it recovers, then gradually remove them over two to three years.
Pruning Types Explained
Different pruning objectives call for different cuts and different amounts of foliage removal. Knowing the four standard pruning types helps you decide what you’re actually trying to accomplish before you climb the ladder. These definitions are standardized across arborist training programs.
Crown Cleaning
Crown cleaning is the routine removal of dead, dying, diseased, and weakly attached branches from the crown. It’s the baseline maintenance every tree benefits from, and it corresponds to the 4 Ds priority framework. Crown cleaning alone is often enough for mature trees in good condition. Expect to remove under 10% of the canopy.
Crown Thinning
Crown thinning selectively removes secondary branches to increase light penetration and air movement through the canopy. The goal is a more open, airy crown without changing the tree’s overall size or shape. Remove branches back to their point of origin rather than shortening them. The result is better light for grass and understory plants, less wind resistance in storms, and reduced disease pressure on inner foliage.
Crown Raising (Crown Lifting)
Crown raising removes the lower branches to provide clearance over streets, sidewalks, lawns, or sightlines. The standard clearance is 8 feet over walkways and 14 feet over streets. Be careful not to raise the crown too high on young trees; lower branches feed the trunk and help it develop taper and strength. A rule of thumb is to keep at least two-thirds of the tree’s height in living crown.
Crown Reduction
Crown reduction decreases the overall size of the crown, often to reduce wind load, clear utility lines, or alleviate weight on heavy limbs. This is not topping. Crown reduction cuts back to a lateral branch that is at least one-third the diameter of the cut, preserving the tree’s natural form. Topping cuts back to a flat, horizontal stub and is widely condemned by arborists.
Common Tree Pruning Mistakes to Avoid
After years of fixing pruning mistakes, both mine and other people’s, I’ve identified the errors that cause the most long-term damage. Avoiding these mistakes will save you from costly tree removal and replacement down the road. The mistakes below dominate beginner regret posts on r/arborists and r/landscaping.
Topping: The Most Damaging Practice
Topping, or cutting main branches back to stubs, devastates tree health and structure. I once worked with a homeowner whose topped oak developed severe decay within two years. The large wounds couldn’t seal properly, and the explosive regrowth created hazardous, weakly attached branches that broke in the next windstorm.
Trees respond to topping by producing numerous water sprouts that grow rapidly but attach weakly. These sprouts are prone to breaking in storms, creating ongoing hazards. The International Society of Arboriculture considers topping the most harmful tree pruning practice, noting it can reduce a tree’s lifespan by 50% or more.
Instead of topping, use crown reduction techniques that maintain the tree’s natural form. Remove entire branches at their point of origin, or cut back to lateral branches at least one-third the diameter of the removed portion. This preserves structure while achieving height reduction.
Flush Cutting and Leaving Stubs
Flush cuts remove the branch collar, eliminating the tree’s natural healing mechanism. Without the collar’s specialized cells, wounds can’t compartmentalize decay, allowing rot to spread into the trunk. U.S. Forest Service research shows flush cuts increase decay potential substantially, and r/arborists consistently cites flush cuts as the most common beginner mistake because they look “cleaner.”
Leaving stubs is the opposite error and is just as damaging. Stubs die back to the collar anyway, wasting the tree’s energy and providing an entry point for pests and decay fungi. The ideal cut splits the difference, just outside the collar without leaving excess wood.
Lion’s Tailing
Removing too many interior branches while leaving foliage only at branch tips creates “lion’s tails.” This practice makes branches top-heavy and prone to breaking. It also eliminates the tree’s ability to dampen wind movement, increasing storm damage risk.
I’ve seen lion’s-tailed trees lose major limbs in moderate winds that wouldn’t have affected properly pruned trees. Maintain foliage throughout the branch length for proper weight distribution and wind resistance. The crown should have even density, not concentrated weight at the extremities.
Using Wound Dressings
Despite old recommendations, wound dressings and pruning paints don’t help trees heal and can actually cause harm. Research from multiple universities confirms that these products trap moisture, promoting decay and preventing natural callus formation.
Trees have evolved their own wound response system called compartmentalization. When you make a proper cut, the tree walls off the wounded area, preventing decay spread. Wound dressings interfere with this natural process. The only routine exception is fresh oak wounds in oak wilt zones, where paint may prevent beetle transmission.
Over-Pruning Young Trees
Young trees need their lower branches and leaves to develop trunk strength and taper. I often see people strip all lower branches from saplings, creating weak, spindly trunks prone to bending and breaking. These temporary branches actually help the tree grow stronger by feeding the trunk.
Keep lower branches until the trunk reaches 2 to 3 inches in diameter, then gradually remove them over several years. This allows the tree to develop proper trunk taper and strength. The Royal Horticultural Society recommends maintaining at least two-thirds of the tree’s height in living crown for optimal growth.
Pollarding vs Topping: A Real Distinction
Pollarding is sometimes confused with topping, but the two are very different. Pollarding is a deliberate, repeated training system started when a tree is young. Cuts are made at the same predetermined points each year, and the tree develops a swollen “knuckle” at each cut that produces a controlled flush of new shoots. Topping is a one-time, unplanned reduction that leaves large, ragged wounds with no future plan.
Pollarding only works on certain species (London plane, some lindens, some willows) and is a maintenance commitment. Topping is almost always harmful and is not a recognized pruning practice. If someone offers to “pollard” your mature oak by cutting it back to bare stubs, they’re really offering to top it. Decline politely.
Tree Aftercare and Recovery
What you do after pruning significantly impacts tree recovery and long-term health. Proper aftercare helps trees compartmentalize wounds, resist disease, and resume vigorous growth. Trees receiving good aftercare typically heal faster and push out more balanced new growth than neglected ones.
Watering After Pruning
Pruned trees need consistent moisture to fuel healing and support new growth. Water deeply once a week during the growing season, providing roughly 10 gallons per inch of trunk diameter. Slow, deep watering encourages root growth and helps trees recover from pruning stress.
Avoid overwatering, which can lead to root rot and weaken the tree further. Check soil moisture 4 to 6 inches deep before watering; if it’s moist, wait a few days. Mulch helps retain moisture and regulate soil temperature, but keep it 3 to 4 inches away from the trunk to prevent collar rot.
Fertilization Considerations
Contrary to popular belief, heavily pruned trees don’t need immediate fertilization. Excess nitrogen can stimulate weak, rapid growth that’s susceptible to pests and diseases. Wait until the following growing season to fertilize, allowing the tree to focus energy on wound healing first.
When you do fertilize, use a balanced, slow-release formula applied at the drip line where feeder roots are most active. The University of Minnesota Extension recommends 1 to 3 pounds of nitrogen per 1,000 square feet of root zone, depending on tree health and soil conditions.
Monitoring for Problems
Check pruning wounds monthly during the first growing season. Look for proper callus formation, a ring of new tissue growing from the wound edges. Healthy callus tissue appears light-colored and smooth, gradually covering the wound from outside to center.
Watch for signs of decay or disease: dark staining around wounds, mushrooms or fungal conks at the base of the tree, oozing sap, or foul odors. These symptoms indicate compartmentalization failure and may require professional assessment. Early detection allows for corrective action before problems spread.
Monitor new growth patterns after pruning. Excessive water sprout production signals over-pruning or stress. A few sprouts are normal and can be gradually removed. If sprouts proliferate throughout the crown, reduce pruning intensity and allow the tree to recover before additional work.
When to Call a Professional Arborist
Knowing your limits keeps you and your trees safe. After working alongside certified arborists for years, I’ve learned to recognize situations requiring professional expertise. Don’t risk injury or tree damage attempting work beyond your capabilities. The line between a weekend project and a call-the-pro job is usually defined by height, branch size, location, and your own experience.
Height and Access Challenges
Any pruning requiring you to leave the ground significantly increases risk. If you can’t reach branches safely from the ground or a standard ladder, call a professional. Certified arborists have specialized equipment, including bucket trucks, climbing gear, and rigging systems, for safe high pruning.
Trees near power lines require professional handling, period. Utility companies often provide free trimming for trees threatening power lines. Never attempt this yourself, as contact with power lines can be fatal. Even indirect contact through branches or tools can conduct deadly electricity.
Large Branch and Tree Removal
Branches over 6 inches in diameter, or those requiring chainsaw use, should be left to professionals unless you have proper training. Large branches can weigh hundreds of pounds and behave unpredictably when cut. Professionals use rigging techniques to control descent and prevent property damage.
Storm-damaged trees pose particular hazards due to tension in bent or broken branches. What looks like a simple removal can release stored energy violently. Certified arborists assess these hazards and use specialized techniques to safely remove damaged portions.
Signs of Disease or Decline
If your tree shows widespread dieback, cankers, unusual growth patterns, or signs of serious disease, consult a certified arborist for diagnosis and treatment recommendations. They can identify problems you might miss and recommend whether the tree can be saved or needs removal.
The International Society of Arboriculture maintains a directory of certified arborists who follow industry standards and continuing education requirements. Look for ISA certification, proper insurance (liability and workers’ comp), and local references when selecting an arborist. Quality professionals provide written estimates and explain their pruning approach before starting work.
What Arborists Typically Cost (and Red Flags)
Professional pruning costs vary widely by region, tree size, and job complexity. As a rough guide, expect small ornamental tree pruning in the $150 to $400 range, medium shade tree work in the $400 to $900 range, and large tree pruning or removals often between $800 and $2,000. Storm cleanup and emergency work runs higher. Always get two to three written estimates.
Red flags when hiring: pressure for immediate commitment, door-to-door solicitation after storms, demands for full payment up front, no written estimate, no proof of insurance, no ISA or equivalent certification, and any contractor who recommends topping as a solution. Reputable arborists welcome questions, explain their cuts in advance, and rarely top healthy trees.
Frequently Asked Questions
How much of a tree can you safely prune at once?
Never remove more than 25% of a tree’s living crown in a single year. For routine maintenance, stay in the 10% to 15% range. If the tree has reached 75% or more of its expected lifespan for the species, prune 10% or less per year. Younger, vigorous trees can tolerate more than mature or stressed ones, but going past 25% almost always triggers stress responses like water sprout proliferation and increased pest pressure.
What are the five rules of pruning?
The five rules are: 1) prune at the right time (dormant for most deciduous trees, after bloom for spring-flowering species, mid-summer for sap-bleeders, dormant only for oaks in wilt zones); 2) use sharp, clean tools sized to the branch; 3) cut just outside the branch collar, never flush; 4) remove no more than 25% of the living crown per year; 5) prune for a clear reason, whether safety, deadwood, structure, or clearance.
What is the 1/2/3 rule of pruning?
The 1/2/3 rule bundles three key numbers. No more than 1/3 of the living canopy should be removed in any single pruning. When shortening a branch, cut back to a lateral that is at least 1/3 (ideally 1/2) the diameter of the cut branch. Any branch over about 2 inches thick should be removed with 3 cuts: undercut, removal cut, and final collar cut.
Should I seal pruning cuts with paint or wound dressing?
In most cases, no. Wound dressings and pruning paints trap moisture, slow callus formation, and can actually promote decay. Trees seal wounds through their own compartmentalization process when cuts are made correctly at the branch collar. The one common exception is fresh oak wounds in oak wilt zones, where immediate wound paint can help block beetle transmission of the fungus.
What is the difference between thinning and heading cuts?
A thinning cut removes an entire branch at its point of origin (usually back to the trunk or a parent limb), preserving the tree’s natural shape while opening up light and air flow. A heading cut shortens a branch by cutting back to a stub or lateral bud, which stimulates dense regrowth near the cut. Thinning cuts are preferred for most structural work because they maintain form and reduce follow-up pruning. Heading cuts are mainly used for fruit tree training and pollarding.
What part of a tree should not be cut?
Never cut into the branch collar, the swollen area where a branch meets the trunk or parent branch. The collar contains the specialized cells the tree uses to seal wounds and compartmentalize decay. Avoid flush cuts that remove the collar, and avoid leaving stubs beyond the collar. Also avoid cutting more than 25% of the living crown in a year, removing the central leader on trees that depend on one, and pruning oaks during April through July in oak wilt zones.
Can I prune fruit trees the same way as shade trees?
The basics are the same, but fruit trees need more aggressive annual pruning to maintain size, open the canopy to sunlight, and encourage fruiting wood. Apple and pear fruit on spurs and can be pruned in late winter. Peach, cherry, and other stone fruit fruit on one-year-old wood and should be pruned in late winter or summer, avoiding wet, cool periods when bacterial canker spreads easily. Each species has its own rules, so check a species-specific guide before tackling fruit trees.
How do I know if a branch is dead or just dormant?
Scratch the bark lightly with your thumbnail or a knife. Living branches show green, moist tissue underneath. Dead branches reveal dry brown or gray. Living branches also stay somewhat flexible, while dead ones snap easily and may have loose or peeling bark. In spring, living branches push out buds and leaves while dead branches stay bare. If you can see green tissue, give the branch another season before removing it.
Why does my tree produce water sprouts after pruning?
Water sprouts indicate stress, usually from heavy pruning, heading cuts, or environmental pressure like drought or root damage. Trees push out these vigorous vertical shoots to quickly replace lost leaf area for photosynthesis. The fix is patience: gradually remove sprouts over several years while correcting the underlying stress, and reduce the severity of future pruning so the tree doesn’t need to compensate so aggressively.
When should I start pruning a newly planted tree?
Wait at least one full growing season before any structural pruning so the tree can establish its root system. During year one, remove only broken, dead, or rubbing branches. Begin light structural pruning in year two or three, focusing on developing a strong central leader and well-spaced scaffold branches. Limit early pruning to under 15% of the crown, since the young tree still needs every leaf it can grow.
Is it better to prune in morning or evening?
Morning is better during the growing season. Cuts made in morning dry quickly, which reduces the window for fungal and bacterial infection. Evening cuts may stay moist through the night, creating favorable conditions for pathogens. During dormant season, time of day matters less because trees aren’t actively growing and disease pressure is low.
How late is too late to prune fruit trees?
For apples and pears, you can prune through early spring as long as buds haven’t broken. Once leaves emerge, switch to summer pruning to avoid pushing tender new growth that won’t harden off. For stone fruit (peach, cherry, plum, apricot), late summer is often the safer window because pruning in cool, wet weather exposes them to bacterial canker. In general, stop heavy pruning about a month before your first expected fall frost.
Final Thoughts
Proper tree pruning is mostly restraint. Less is almost always more. Every cut should serve a clear purpose, whether removing a hazard, fixing a structural defect, or improving light and air flow. The five rules of pruning, the branch collar, the 4 Ds, and the three-cut method are not theory. They are the accumulated wisdom of generations of arborists, and they hold up in real backyards.
Start with the 4 Ds. If you stop there, your trees will already be better off than most. From there, build confidence with small, careful cuts and observe how your trees respond season to season. That observation is what turns pruning from a chore into a skill. The techniques in this guide come from hands-on experience combined with research from leading institutions like university extensions and the International Society of Arboriculture. Use them, and your trees will repay you with decades of shade, structure, and beauty.
Remember that trees are remarkably resilient when treated properly. Even if you’ve made pruning mistakes in the past, following correct techniques moving forward allows trees to recover and thrive. Take time to observe your trees throughout the seasons, learning their growth patterns and responses to pruning. With patience, proper technique, and respect for the tree’s biology, you can successfully maintain your trees’ health and beauty through thoughtful pruning for the rest of their lives.

![Best Time to Scarify Your Lawn: Complete [cy] Timing Guide](https://www.guidespot.com/wp-content/uploads/2026/07/featured-update-44654-1784925232004-370x245.jpg "Best Time to Scarify Your Lawn (August 2026): UK & US Timing")
![How to Store a Lawn Mower for Winter: Complete Guide [cy]](https://www.guidespot.com/wp-content/uploads/2026/07/featured-update-44769-1784923680885-370x245.jpg "How to Store a Lawn Mower for Winter: Step-by-Step Guide")
![10 Yard Projects to Complete in September [cy]](https://www.guidespot.com/wp-content/uploads/2026/07/featured-update-44777-1784837555243-370x245.jpg "10 Yard Projects to Complete in September 2026")