If you are planning to install a smart doorbell in 2026, you are in the right place. This guide walks you through every step of the process, from choosing between wired and wireless models to mounting, wiring, and configuring your new device. Whether you are replacing an old doorbell or starting from scratch, the instructions below cover both scenarios in full detail.
Here is a quick overview of what this guide covers and how long each phase takes:
- Choose your doorbell type: wireless (30 to 45 minutes) or wired (45 to 90 minutes)
- Gather tools and verify your home’s electrical setup
- Remove your existing doorbell safely
- Mount the bracket and connect wiring (if applicable)
- Set up the companion app, pair via QR code, and connect to Wi-Fi
- Configure motion zones, chime settings, and smart home integrations
- Troubleshoot common issues and set up a maintenance routine
Most homeowners can handle either installation path with basic tools and careful attention to safety. I have completed dozens of these installations myself, and each one followed the same core steps you will find below. If you hit a wall at any point, the troubleshooting section and professional installation guidance will help you decide whether to push through or call a licensed electrician.
Wired vs Wireless: Which Smart Doorbell Is Right for You?
Before you learn how to install a smart doorbell, it helps to understand the two main types. Wireless models run on rechargeable batteries and communicate with your home network over Wi-Fi. Wired models draw continuous power from your existing doorbell transformer and typically connect to your home’s mechanical or digital chime.
Wireless doorbells appeal to renters, apartment dwellers, and anyone without existing doorbell wiring. They are simpler to mount, require no electrical work, and can be moved easily. The trade-off is battery maintenance: most need recharging every one to six months depending on motion event frequency and live-view usage. Solar charging accessories can extend run times for some models, but they add another component to manage.
Wired doorbells provide constant power, so you never need to worry about a dead battery at the worst possible moment. They also integrate more reliably with existing chime systems. The downside is that installation involves low-voltage wiring, and you may need to upgrade an old transformer if it does not supply 16 to 24 volts AC at a sufficient VA rating. If your home has no existing doorbell wiring at all, running new wire adds complexity and cost.
Here is a side-by-side comparison to help you decide:
- Power source: Wireless uses a rechargeable battery (or optional solar panel). Wired connects to a 16 to 24V AC doorbell transformer for continuous power.
- Installation difficulty: Wireless is beginner-friendly with no electrical work. Wired requires basic wiring skills and a voltage tester.
- Ongoing maintenance: Wireless needs periodic battery recharging. Wired is mostly maintenance-free after setup.
- Chime compatibility: Wireless usually includes a plug-in chime or relies on phone notifications. Wired works with existing mechanical or digital chimes (may require a chime connector kit).
- Best for: Wireless suits renters, apartments, and homes without existing wiring. Wired suits homeowners with functional doorbell circuits who want zero battery hassles.
Critical Safety Precautions Before You Begin
WARNING: Working with electrical systems carries real risk. Always shut off power at the circuit breaker before touching any doorbell wiring. If you feel unsure about any step involving electricity, hire a licensed electrician.
The National Electrical Code (NEC) classifies doorbell circuits as Class 2 low-voltage systems, typically operating at 16 to 24V AC. However, the transformer that steps household voltage down to that level connects directly to your home’s 120V supply. That means the transformer’s primary-side terminals carry enough voltage to cause serious injury if handled while energized.
Before starting any smart doorbell installation, run through this safety checklist:
- Identify and label the circuit breaker that controls your doorbell system
- Test your non-contact voltage tester on a known live outlet to confirm it is working
- Never handle wiring in damp or wet conditions
- Verify that all components carry UL certification or an equivalent safety listing
- Follow the manufacturer’s published voltage and current specifications exactly
- Check your local building codes for any requirements specific to your area
The Electrical Safety Foundation International stresses that improper electrical installation can lead to shock, fire, or equipment damage. I have seen installations go sideways when people skipped verification steps, so treat every precaution as mandatory, not optional.
Tools and Materials You Will Need
Gathering everything before you start saves time and prevents mid-project trips to the hardware store. Here is what I keep on hand for every smart doorbell installation.
Essential Tools
- Phillips and flathead screwdrivers
- Drill with 3/32-inch pilot-hole bit and masonry bits (for brick or stucco surfaces)
- Small level for straight mounting
- Wire strippers (required for wired installations)
- Non-contact voltage tester (a safety must-have)
- Digital multimeter (to measure transformer output)
- Pencil for marking drill points
- Safety glasses
Materials for Wireless Installation
- Your wireless smart doorbell with charged battery
- Mounting bracket and included hardware kit
- Wall anchors (for mounting on surfaces without studs)
- Optional: angled mounting wedge for a better camera angle
- Optional: solar charging panel if your model supports one
Additional Materials for Wired Installation
- 16 to 24V AC doorbell transformer (if the existing unit is undersized)
- 18-gauge doorbell wire (for extending short runs)
- Wire nuts and electrical tape
- Chime connector kit or diode (often included with the doorbell)
- Painter’s tape (to hold wires against the wall so they do not slip back inside)
How to Find Your Doorbell Transformer
Before you can assess whether your existing wiring will work with a smart doorbell, you need to locate the transformer. This small metal box steps your home’s 120V supply down to the 16 to 24V AC that doorbells require. It is one of the most common pain points I hear about on forums like r/smarthome and r/electrical, because transformers are often tucked away in out-of-sight locations.
Check these spots in order:
- Near the electrical panel: Many builders mount the transformer on the outside of or directly beside the main breaker box.
- Basement or crawl space: Look along the ceiling joists within a few feet of where the front door is located above.
- Attic: In some homes the transformer sits on an attic joist above the front wall.
- Inside the chime enclosure: A few models integrate the transformer into the chime housing itself, typically behind a small access panel.
- Garage wall: For attached garages, check the wall shared with the main house near the front door.
Once you find the transformer, use a multimeter set to AC voltage to test across the two low-voltage terminals. You should see a reading between 16V and 24V. If the reading is below 16V or above 24V, you will need to replace the transformer before installing a wired smart doorbell.
How to Remove Your Old Doorbell
If you are replacing an existing doorbell with a smart model, you need to remove the old unit first. This step applies to both wired and wireless installations, though wired removal involves a few extra precautions.
Removing a Wireless Old Doorbell
For battery-powered or plug-in doorbells, removal is straightforward. Unscrew the mounting bracket from the wall, pull any wall anchors out, and patch the holes if needed. If the old unit used adhesive mounting strips, warm the adhesive with a hair dryer on low heat before peeling to avoid damaging the paint.
Removing a Wired Old Doorbell
Step 1: Shut off power at the circuit breaker that controls the doorbell circuit. Use your non-contact voltage tester at the doorbell location to confirm the wires are de-energized.
Step 2: Unscrew the old doorbell button from the wall. You will see two low-voltage wires connected to terminal screws on the back. Snap a photo of the wire arrangement so you have a reference.
Step 3: Loosen the terminal screws and disconnect the wires. Use painter’s tape to stick each wire against the wall so it cannot slip back into the wall cavity. This is a tip I picked up from the r/diyelectronics community, and it saves enormous frustration.
Step 4: If you are not going to reuse the existing wires and plan to go fully wireless, cap each wire with a wire nut and wrap it with electrical tape. Tuck the capped wires into the wall opening so they are safe and out of the way. Never leave bare copper wires exposed, even on a de-energized circuit.
Step-by-Step Wireless Smart Doorbell Installation
Wireless models are the fastest path from unboxing to a working video doorbell. Since there is no electrical wiring to handle, the entire process centers on charging, app setup, and physical mounting.
Step 1: Charge the Battery Fully
Connect the doorbell to its USB charging cable and let it reach a full charge before doing anything else. Most models need four to six hours for a complete charge. While you wait, download the manufacturer’s companion app and create your account so you are ready for the pairing step.
Step 2: App Setup and QR Code Pairing
I always complete app setup indoors where Wi-Fi is strong rather than at the front door where the signal may be weaker. Open the app, tap “Add Device,” and follow the on-screen prompts. Most current smart doorbells use QR code pairing: the app displays a QR code on your phone screen, and you hold the doorbell camera up to it. The doorbell scans the code, extracts your Wi-Fi credentials, and connects automatically.
During this phase, the app will also ask you to:
- Grant camera and microphone permissions
- Verify the live video feed and test two-way audio
- Select your preferred notification types (motion, doorbell press, package detection)
- Enable two-factor authentication on your account for added security
Step 3: Choose the Mounting Location
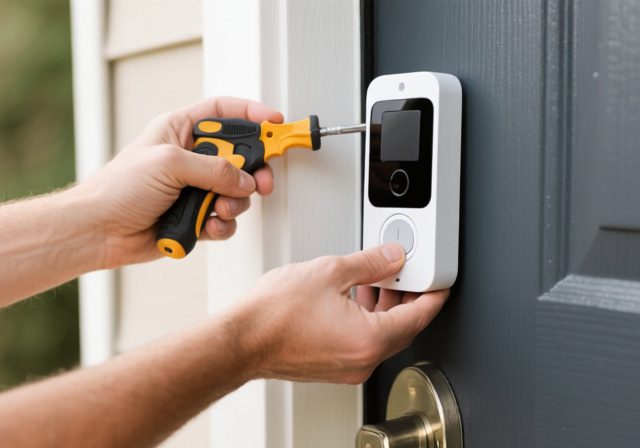
Position the doorbell at roughly 48 inches from the ground to the center of the lens. This height captures faces clearly and gives you a useful view of packages on the porch. Keep these factors in mind when choosing the exact spot:
- Clear sightline to your entry walkway and porch area
- Some shelter from direct rain or snow (an overhang or awning helps)
- Wi-Fi signal strength at the mounting point (aim for -70 dBm or stronger)
- Easy access for future battery removal and recharging
Step 4: Mount the Bracket
Hold the mounting bracket against the wall at your chosen location. Place a small level on top to confirm the bracket sits straight, then mark the screw holes with a pencil. The drilling technique depends on your wall surface:
Wood or vinyl siding: Drill a 3/32-inch pilot hole at each mark and drive the included screws directly into the surface.
Brick or concrete: Use a masonry bit sized for the included wall anchors. Drill into the mortar joints if possible rather than the brick face to reduce cracking risk. Tap the anchors into the holes, then drive the screws through the bracket and into the anchors.
Stucco: Drill slowly with a masonry bit and apply steady, light pressure. If you can locate a wooden stud behind the stucco layer, use longer screws that bite into the stud for a more secure hold.
Step 5: Attach the Doorbell to the Bracket
Slide or snap the doorbell body onto the mounted bracket, following the specific method for your model. Most units also include a security screw at the bottom that locks the doorbell to the bracket and makes it harder to steal. Tighten that screw with the provided tool.
Step 6: Test and Fine-Tune
Press the doorbell button and confirm that your phone receives a push notification with a live video feed within a few seconds. Walk through the detection zone to check that motion alerts fire as expected. If the camera angle is off, add an angled wedge between the bracket and the doorbell. Finally, set your motion detection zones to exclude the street or sidewalk so you are not flooded with false alerts from passing cars and pedestrians.
Step-by-Step Wired Smart Doorbell Installation
Wired installation takes longer because it involves verifying voltage, working with low-voltage wiring, and configuring chime compatibility. The payoff is continuous power with no battery to recharge.
Step 1: Shut Off Power and Verify Your System
CRITICAL: Turn off the circuit breaker that supplies your doorbell transformer. Then use your non-contact voltage tester at the doorbell location to confirm the wires are not live. This is not a suggestion; it is a safety requirement.
With the breaker off, locate your transformer (refer to the “How to Find Your Doorbell Transformer” section above if you have not already). Temporarily turn the breaker back on and measure the transformer’s output with a multimeter set to AC voltage. Smart doorbells generally require 16 to 24V AC at a minimum of 10VA. If your transformer reads below 16V or carries a rating under 10VA, plan to replace it before continuing (covered in the next major section).
Step 2: Remove the Old Doorbell Button
With the breaker confirmed off, unscrew the existing doorbell button from the wall. Photograph the wire connections on the back. Disconnect the two wires from the terminals and tape each one to the wall with painter’s tape so they cannot retreat into the wall cavity.
Step 3: Inspect and Prepare the Wiring
Examine each wire for cracked insulation, corrosion, or frayed copper. If you see damage, strip back to clean copper using wire strippers, removing roughly three-eighths of an inch of insulation from each end.
If the existing wires are too short to reach the smart doorbell terminals, extend them with 18-gauge doorbell wire. Join the old and new sections with wire nuts and wrap each connection with electrical tape. The painter’s tape trick mentioned earlier is especially useful here: tape the extended wires to the wall so they stay put while you work on the bracket.
Step 4: Install the Mounting Bracket
Feed both wires through the center hole of the smart doorbell’s mounting bracket. Position the bracket against the wall, check it with a level, and mark the screw holes. Drill pilot holes if the surface requires them, then secure the bracket with the included screws and wall anchors.
Step 5: Connect the Wires to the Doorbell
Most smart doorbells are not polarity-sensitive, so either wire can go to either terminal. Double-check your model’s instructions to confirm. Wrap each wire around its terminal screw and tighten firmly. Give each wire a gentle tug to make sure it is securely seated. Loose connections are the single most common cause of wired doorbell failures.
Some brands include a small diode or jumper wire that must be installed at your indoor chime unit. Ring doorbells, for example, often need a diode across the chime terminals to prevent buzzing. Follow the manufacturer’s instructions for this step before moving on.
Step 6: Mount the Doorbell and Restore Power
Carefully tuck excess wire into the wall opening and seat the doorbell onto the mounting bracket. Install any provided security screws. Return to the circuit breaker and switch power back on. The doorbell should power up within a few seconds.
Step 7: Configure Chime Settings and Complete App Setup
Open the companion app, add the doorbell as a new device, and follow the pairing steps. When the app asks about your chime type, select “mechanical” if your chime uses physical metal bars that strike a tone, or “digital” if it plays an electronic melody through a speaker. This selection tells the doorbell how much power to reserve for the chime circuit.
If your mechanical chime buzzes, hums, or does not ring at all after installation, you likely need to install the included chime connector kit at the chime unit. The chime connector acts as a power regulator that prevents the constant trickle current from causing the chime solenoid to vibrate. This topic is covered in more detail in the Doorbell Chime Compatibility Guide below.
Doorbell Chime Compatibility Guide
Chime compatibility is one of the most misunderstood aspects of smart doorbell installation. The type of chime you have affects how the doorbell draws power and whether you will experience buzzing, hum, or no sound at all.
Mechanical Chimes
A mechanical chime uses electromagnetic solenoids to strike metal bars inside the chime enclosure. When the doorbell button is pressed, the circuit completes and the solenoids activate. Smart doorbells draw a small continuous current through this circuit to stay powered, and that trickle of current can cause the solenoid to vibrate or hum even when no one is at the door.
The fix is straightforward: install the chime connector kit (sometimes called a power module or diode) that shipped with your smart doorbell. This small device attaches across the “TRANS” and “FRONT” terminals inside the chime enclosure and regulates the power flow. Without it, you will almost certainly hear buzzing, and the chime may fail to ring at all.
Digital Chimes
Digital chimes generate tones electronically through a small speaker rather than using physical bars and solenoids. They are less prone to buzzing, but not all smart doorbells support them natively. Check your doorbell’s compatibility list before purchasing. If your digital chime is not supported, most smart doorbell apps let you disable the indoor chime entirely and rely on phone notifications or a plug-in wireless chime instead.
No Existing Chime
If your home has never had a chime, wired smart doorbells can still work. Many manufacturers offer a plug-in chime accessory that plugs into any indoor wall outlet and communicates wirelessly with the doorbell. Some wired models also operate without any chime at all, relying solely on phone and smart display notifications.
Transformer Upgrade or Replacement
If your existing transformer outputs less than 16V or is rated below 10VA, it needs to be replaced. This task involves connecting to 120V household wiring, so if you are not fully comfortable working inside a junction box, this is the point where calling an electrician makes sense.
Transformer Replacement Steps
- Shut off power at the main circuit breaker for the transformer circuit.
- Remove the old transformer from its junction box or mounting location.
- Connect the new transformer’s primary (120V) leads to the household supply wires using wire nuts. Match black to black (hot), white to white (neutral), and green or bare to ground.
- Connect the existing doorbell wires to the transformer’s secondary (low-voltage) terminals.
- Secure the transformer to the junction box or mounting stud.
- Restore power and measure the output with your multimeter to confirm 16 to 24V AC.
Per NEC Article 725, doorbell transformers must be Class 2 rated with built-in overcurrent protection. Always select a replacement transformer that carries a UL listing and matches your smart doorbell’s published voltage and VA requirements. A 16V 30VA transformer is a safe choice for most single-doorbell installations.
Wi-Fi Setup and Optimization
A solid Wi-Fi connection is the backbone of a reliable smart doorbell. Many issues that users attribute to a defective doorbell are actually wireless network problems in disguise.
Check Signal Strength
Stand at the mounting location with your phone and open a Wi-Fi analyzer app. You want a signal strength of -70 dBm or better. Anything below -75 dBm will cause intermittent disconnections, delayed notifications, and degraded video quality.
Improve a Weak Signal
- Move your router closer to the front of the house, or elevate it to reduce obstruction
- Install a Wi-Fi extender or a mesh network node in a room near the front door
- Connect the doorbell to the 2.4 GHz band rather than 5 GHz (2.4 GHz penetrates walls and distances better)
- Switch your router to a less congested Wi-Fi channel using the analyzer app
- Consider brand-specific extenders like the Ring Chime Pro, which doubles as a Wi-Fi extender for Ring devices
Network Configuration Tips
- Make sure your network name (SSID) does not contain special characters or emojis
- Temporarily disable MAC address filtering during the initial pairing process
- Verify that your router’s firewall is not blocking the doorbell’s outbound connections
- Enable UPnP on your router if the doorbell supports it
- If your router broadcasts separate 2.4 GHz and 5 GHz bands with the same SSID, temporarily rename them during setup so you can force the doorbell onto the 2.4 GHz band
Troubleshooting Common Installation Issues
Even careful installations can hit snags. These are the problems I encounter most often and the solutions that resolve them.
Doorbell Will Not Power On (Wired)
Solutions:
- Use a multimeter to confirm the transformer is outputting 16 to 24V AC at the doorbell terminals
- Inspect every wire connection for looseness or corrosion
- Verify the circuit breaker is in the ON position
- Test wire continuity along the full run between the transformer and the doorbell
- Replace the transformer if the output voltage falls below spec
Mechanical Chime Buzzing or Not Ringing
Solutions:
- Install the chime connector kit or diode at the chime unit’s terminals
- Confirm you selected the correct chime type (mechanical vs digital) in the app
- Verify that the transformer VA rating meets the doorbell’s minimum requirement
- Try a digital chime adapter if your mechanical chime remains incompatible
Poor Wi-Fi Connection or Frequent Disconnects
Solutions:
- Install a Wi-Fi extender within 20 to 30 feet of the doorbell
- Switch from the 5 GHz band to 2.4 GHz for better wall penetration
- Update your router’s firmware to the latest version
- Reduce network congestion by disconnecting unused devices
- Check for interference from nearby baby monitors, microwaves, or Bluetooth devices
Motion Detection Too Sensitive or Unresponsive
Solutions:
- Narrow your motion zones in the app to exclude the street, sidewalk, or neighboring properties
- Lower the motion sensitivity slider and test until you find the right threshold
- Clean the camera lens and the passive infrared (PIR) sensor window
- Confirm the doorbell is mounted at the recommended 48-inch height and angled correctly
- Check for heat sources (vents, reflected sunlight) aimed at the sensor that can cause false triggers
Battery Draining Quickly (Wireless Models)
Solutions:
- Reduce the frequency of motion-triggered recordings
- Lower the video resolution setting (1080p uses less power than 2K or 4K)
- Minimize live-view sessions, which are the biggest battery drain
- Improve Wi-Fi signal strength, because a weak signal forces the radio to work harder and depletes the battery faster
- Consider adding a solar panel charger or switching to a wired power adapter if your model supports either option
Rental and Apartment Considerations
Installing a smart doorbell in a rental apartment or condo comes with extra constraints. You need to think about landlord permission, lease restrictions, and whether the installation should be reversible when you move out.
Check your lease first. Many leases prohibit drilling holes in exterior walls or modifying electrical systems. Some landlords are flexible if you explain that a smart doorbell improves building security, but get written permission before making any permanent changes.
Choose a wireless model for rentals. Battery-powered doorbells avoid the need to touch wiring or drill into masonry. Double-sided adhesive mounting tape (like 3M VHB strips) works well on smooth surfaces and removes cleanly with no wall damage. If you must drill, use small-diameter screws and fill the holes with spackle or white caulk before you move out.
Be mindful of shared walls and common areas. Point the camera at your own entry area and use privacy zone masking to avoid capturing footage of neighboring units or shared hallways. This is both a courtesy and a legal consideration in many jurisdictions.
Professional Installation: When to Call an Electrician
While I encourage a DIY approach whenever it is safe and practical, certain situations call for a professional. Knowing when to hire help can save you from costly mistakes and ensure your installation meets local electrical codes.
When Professional Help Is the Right Call
Consider contacting a licensed electrician or a professional installation service if any of these apply to your situation:
- Your home has no existing doorbell wiring and you need a new circuit run from the electrical panel to the front door
- The existing wiring uses aluminum conductors or you discover other outdated electrical materials
- You need to replace a transformer but are not comfortable working inside a junction box with 120V connections
- Your local jurisdiction requires a licensed electrician for low-voltage wiring modifications
- You have tried troubleshooting power delivery issues and the doorbell still will not function reliably
- You live in a multi-unit building and the chime or transformer is in a shared utility space you cannot access
Professional Installation Costs and Service Options
Professional smart doorbell installation typically ranges from $100 to $300 depending on the complexity of the job and your geographic area. Below is a breakdown of common service providers and what you can expect to pay:
- Best Buy Geek Squad: Charges around $150 for a standard wired or wireless smart doorbell installation. This covers mounting, wiring connections, app setup, and a walkthrough of basic features. Best Buy technicians are licensed where required and carry insurance.
- OnTech Smart Services: Partners with Ring and other brands to offer professional installation starting at approximately $160. OnTech technicians specialize in smart home devices and can handle transformer upgrades and chime compatibility issues as part of the service.
- TaskRabbit: Connects you with local handymen and women who can mount and wire a doorbell. Rates vary by market but generally fall between $50 and $120 for the labor alone. Keep in mind that TaskRabbit workers may not be licensed electricians, so verify qualifications before hiring for any job involving 120V wiring.
- Independent licensed electrician: An electrician will charge $150 to $300 for a doorbell installation, depending on whether a new transformer, new wiring run, or junction box work is needed. This is the best option for homes with older electrical systems or complex wiring requirements.
Forum discussions on r/electrical reveal that some homeowners have received quotes as high as $750 to $1,000 for doorbell installation combined with drywall repair. Those figures are outliers and usually reflect significant wall repair or full circuit installation rather than a straightforward swap. For a typical replacement or new-mount job, expect the prices listed above.
Maintenance and Long-Term Care
A smart doorbell that is properly maintained will deliver reliable service for years. I follow a simple schedule to keep everything in good working order.
Monthly Tasks
- Wipe the camera lens with a microfiber cloth to remove dust, fingerprints, and water spots
- Open the companion app and install any available firmware updates
- Trigger a test motion event and a test doorbell press to confirm notifications arrive promptly
- Review your saved video clips and delete any you no longer need to free up storage
Seasonal Maintenance
- Spring: Inspect weather seals and gaskets for damage from winter weather. Clean off any salt or grime residue.
- Summer: Check that the doorbell has adequate ventilation. Direct sun on a dark-colored doorbell in 100-degree heat can cause thermal shutdowns.
- Fall: Test night vision performance as days grow shorter and the camera relies more on infrared.
- Winter: Monitor battery life closely, because cold temperatures can reduce lithium-ion capacity by 20 percent or more. If your wireless doorbell’s battery drops unusually fast in winter, consider bringing it indoors to charge more frequently.
Annual Checks
- Inspect wire connections at the doorbell and transformer for corrosion or looseness
- Measure transformer output voltage with a multimeter to confirm it remains within spec
- Tighten the mounting bracket screws if the doorbell has become loose
- Update your Wi-Fi password in the app if you changed your home network credentials
- Review all privacy, security, and sharing settings in the companion app
Smart Home Integration
Connecting your smart doorbell to the rest of your smart home ecosystem unlocks automations that make the doorbell far more useful than a standalone device. Most current video doorbells support at least one major voice platform, and many work with all three of the big names: Amazon Alexa, Google Home, and Apple HomeKit. Newer models are also starting to adopt the Matter protocol, which provides a universal standard that lets devices work across platforms without brand-specific integrations.
Amazon Alexa Integration
Amazon’s ecosystem is the most broadly supported by smart doorbell manufacturers. To connect your doorbell to Alexa, open the Alexa app, go to “Devices,” tap the plus icon, and select “Add Device.” Find your doorbell brand in the list and sign in with your manufacturer account credentials to link the two services.
Once linked, you can enable these features:
- Announcements: When someone presses the doorbell, Alexa-enabled Echo devices throughout your home can announce “Someone is at the front door.”
- Live view on Echo Show: Say “Alexa, show me the front door” to pull up a live camera feed on any Echo Show or Fire TV device.
- Routines: Create Alexa routines that trigger other actions when the doorbell rings or motion is detected. For example, you can have Alexa turn on the porch light and unlock a smart lock when a doorbell press is detected after sunset.
Google Home Integration
Google’s integration works through the Google Home app. Open the app, tap the plus icon, select “Set up device,” then “Works with Google,” and search for your doorbell brand. Sign in to link your account.
Key capabilities include:
- Visitor announcements: Google Nest Hub and Nest Mini devices can announce when someone presses the doorbell or when a person is detected at the door.
- Live view on smart displays: Say “Hey Google, show the front door camera” to view the live feed on a Nest Hub or Chromecast-equipped TV.
- Google Home routines: Build routines that link the doorbell to other devices, such as turning on outdoor lights when motion is detected.
Apple HomeKit Integration
HomeKit support is less common among smart doorbells, but models from brands like Logitech and Aqara offer it. To add a HomeKit-compatible doorbell, open the Apple Home app, tap “Add Accessory,” and scan the HomeKit setup code printed on the device or in its packaging.
HomeKit integration provides:
- Siri control: Say “Hey Siri, show me the front door” to view the camera feed on an iPhone, iPad, or Apple TV.
- HomeKit automations: Trigger scenes that combine the doorbell with other HomeKit devices, such as turning on lights and sending a notification when motion is detected.
- HomeKit Secure Video: Some models support Apple’s end-to-end encrypted video storage, which stores recordings in iCloud without exposing them to third-party servers.
IFTTT and Advanced Automations
If your doorbell supports IFTTT (If This Then That), you can create custom applets that connect the doorbell to hundreds of other services and devices. Some practical examples include logging every doorbell press in a Google Spreadsheet, sending an SMS to a family member who does not have the app, or flashing smart lights in a specific color when a package is detected at the door.
The emerging Matter and Thread protocols are gradually reducing the need for IFTTT workarounds by enabling direct device-to-device communication across platforms. If you are shopping for a new smart doorbell in 2026, look for Matter certification as a future-proofing feature.
Security Best Practices for Smart Doorbells
Adding an internet-connected camera to the exterior of your home raises legitimate privacy and security questions. Taking a few proactive steps will protect both your personal data and your household’s physical security.
Secure Your Account
- Use a strong, unique password for your doorbell account (a password manager helps here)
- Enable two-factor authentication (2FA) on every doorbell account that supports it
- Review the account’s connected devices list periodically and revoke access for any device you no longer use
Keep Firmware Current
Firmware updates often patch security vulnerabilities. Most apps allow you to enable automatic firmware updates, and I recommend doing so. If your doorbell does not support automatic updates, check manually once a month during your routine maintenance.
Configure Privacy Zones
Privacy zones let you black out portions of the camera’s field of view that you do not want to record, such as a neighbor’s front door or a public sidewalk. Setting these zones is both courteous and, in some jurisdictions, legally advisable.
Understand Data Storage Policies
Know whether your doorbell stores video clips in the cloud, locally on a microSD card, or both. Cloud storage typically requires a subscription and means your recordings live on the manufacturer’s servers. Local storage keeps data in your physical possession but can be lost if the device is stolen. Some models, particularly those supporting HomeKit Secure Video, offer end-to-end encryption so the manufacturer cannot view your recordings even if they wanted to.
How to Install Smart Doorbell: Frequently Asked Questions
Do I need an electrician to install a smart doorbell?
For wireless battery-powered models, an electrician is not necessary. Most homeowners can install a wireless doorbell with basic tools in under an hour. Wired installations with existing doorbell wiring are also manageable as a DIY project if you are comfortable using a voltage tester and wire strippers. However, if you need new wiring run from scratch, must replace a transformer connected to 120V household circuits, or discover aluminum wiring or other outdated materials, hiring a licensed electrician is the safer choice.
How long does smart doorbell installation take?
A wireless smart doorbell installation typically takes 30 to 45 minutes from unboxing to a fully configured device. A wired installation with compatible existing wiring takes 45 to 90 minutes. First-time installers should budget 60 to 120 minutes to work through each step carefully. If a transformer replacement is needed, add another 30 to 60 minutes. Professional installers usually complete the entire job in 30 to 60 minutes.
What voltage does a smart doorbell need?
Most smart doorbells require 16 to 24V AC supplied by a doorbell transformer. The transformer also needs sufficient power capacity, generally rated at a minimum of 10VA. Some models can operate on as little as 8V, while high-end doorbells with bright floodlights or high-resolution cameras may need the full 24V at 30VA or more. Always verify your specific model’s requirements and test your transformer output with a multimeter before installation.
Can I install a smart doorbell without existing wiring?
Yes. Battery-powered wireless smart doorbells are designed exactly for this scenario. They run on rechargeable lithium-ion batteries that typically last one to six months between charges depending on usage. Many models also support optional solar charging panels that trickle-charge the battery during daylight hours, or plug-in power adapters that draw from a nearby indoor outlet through a small cable.
Why is my smart doorbell not getting power from existing wiring?
The most common cause is an undersized transformer that outputs less than 16V AC or has an insufficient VA rating. Other causes include loose or corroded wire connections, a tripped circuit breaker, damaged wiring between the transformer and the doorbell, or a missing chime connector kit that the doorbell requires for power regulation. Use a multimeter to test voltage at the doorbell terminals and work backward to isolate the problem.
Will a smart doorbell work with my existing chime?
Most smart doorbells are compatible with standard mechanical and digital chimes. Mechanical chimes may buzz or hum without a chime connector kit installed at the chime terminals. Digital chimes are less prone to buzzing but may not be supported by every doorbell model. Check your specific doorbell’s compatibility list. If your chime is not supported, you can use a plug-in wireless chime accessory or rely on phone notifications instead.
How can I improve my smart doorbell Wi-Fi connection?
Start by checking signal strength at the mounting location with a Wi-Fi analyzer app. If it reads below -70 dBm, install a Wi-Fi extender or mesh node within 20 to 30 feet of the doorbell. Connect the doorbell to the 2.4 GHz band for better range through walls. Update your router firmware, switch to a less congested channel, and temporarily disable MAC filtering during setup. Some doorbell brands sell their own Wi-Fi extenders optimized for video streaming.
Is smart doorbell installation difficult for beginners?
Wireless installation is very beginner-friendly and requires no electrical skills. You charge the battery, pair the device through the app, mount a bracket, and snap the doorbell into place. Wired installation is more involved because it requires using a voltage tester, handling low-voltage wiring, and potentially replacing a transformer. Following the manufacturer’s instructions step by step and observing safety precautions makes wired installation achievable for most motivated DIYers.
What are the disadvantages of a smart doorbell?
Smart doorbells depend on a stable Wi-Fi connection and continuous power, whether from a battery or wired transformer. Battery models need periodic recharging, which can be inconvenient. Cloud video storage usually requires a monthly subscription fee. Privacy concerns exist because video and audio data pass through the manufacturer’s servers. Some models may have limited compatibility with older chime systems, and professional installation can add significant cost if wiring work is needed.
How do wireless doorbells get power?
Wireless smart doorbells run on built-in rechargeable lithium-ion batteries. Depending on the model and how often the doorbell records motion events, a full charge can last anywhere from one to six months. Some wireless models also support optional solar panels that mount near the doorbell and provide a trickle charge during daylight hours. A few models offer plug-in power adapters that route a thin cable from an indoor outlet through a door or window frame to the outdoor unit.
Can I install a smart doorbell in an apartment?
Yes, many renters successfully install wireless smart doorbells using adhesive mounting strips instead of screws to avoid drilling into walls. Before installing, check your lease agreement for any restrictions on exterior modifications and get written landlord permission if required. Point the camera only at your own entry area and use privacy zone masking to avoid recording common hallways or neighboring units.
How much does professional smart doorbell installation cost?
Professional installation typically costs between $100 and $300. Best Buy Geek Squad charges approximately $150 for a standard installation. OnTech Smart Services, which partners with Ring and similar brands, starts around $160. Independent licensed electricians generally charge $150 to $300 depending on the complexity of the wiring work. TaskRabbit handyman services can be less expensive at $50 to $120 for labor, but may not include licensed electrical work.
Conclusion
Learning how to install a smart doorbell is one of the most practical upgrades you can make to your home. Whether you go with a wireless model that mounts in minutes or a wired installation that delivers uninterrupted power, the process is manageable for anyone willing to follow the steps carefully and observe basic safety precautions.
The key takeaways from this guide are straightforward: verify your transformer voltage before starting a wired install, use painter’s tape to keep wires from slipping back into the wall, always test with a voltage tester before touching any wiring, and set up your Wi-Fi connection before you mount the doorbell outdoors. If at any point you encounter wiring that looks damaged, outdated, or beyond your comfort level, a licensed electrician can complete the job safely and usually within an hour.
Once your smart doorbell is mounted and configured, you gain real-time visibility into who is at your door, package delivery notifications, two-way audio communication from anywhere, and the ability to integrate the doorbell with your broader smart home setup. Pair it with a voice assistant, link it to your smart lights, or simply enjoy the peace of mind that comes from seeing a live video feed of your entryway on your phone. Stay on top of monthly lens cleaning, seasonal checks, and firmware updates, and your smart doorbell will serve you reliably for years to come.

![How to Clean a Laptop Screen Without Damaging It in [cy]](https://www.guidespot.com/wp-content/uploads/2026/07/featured-update-44590-1783188935088-370x245.jpg "How to Clean a Laptop Screen (2026): The Ultimate Safe Display Guide")