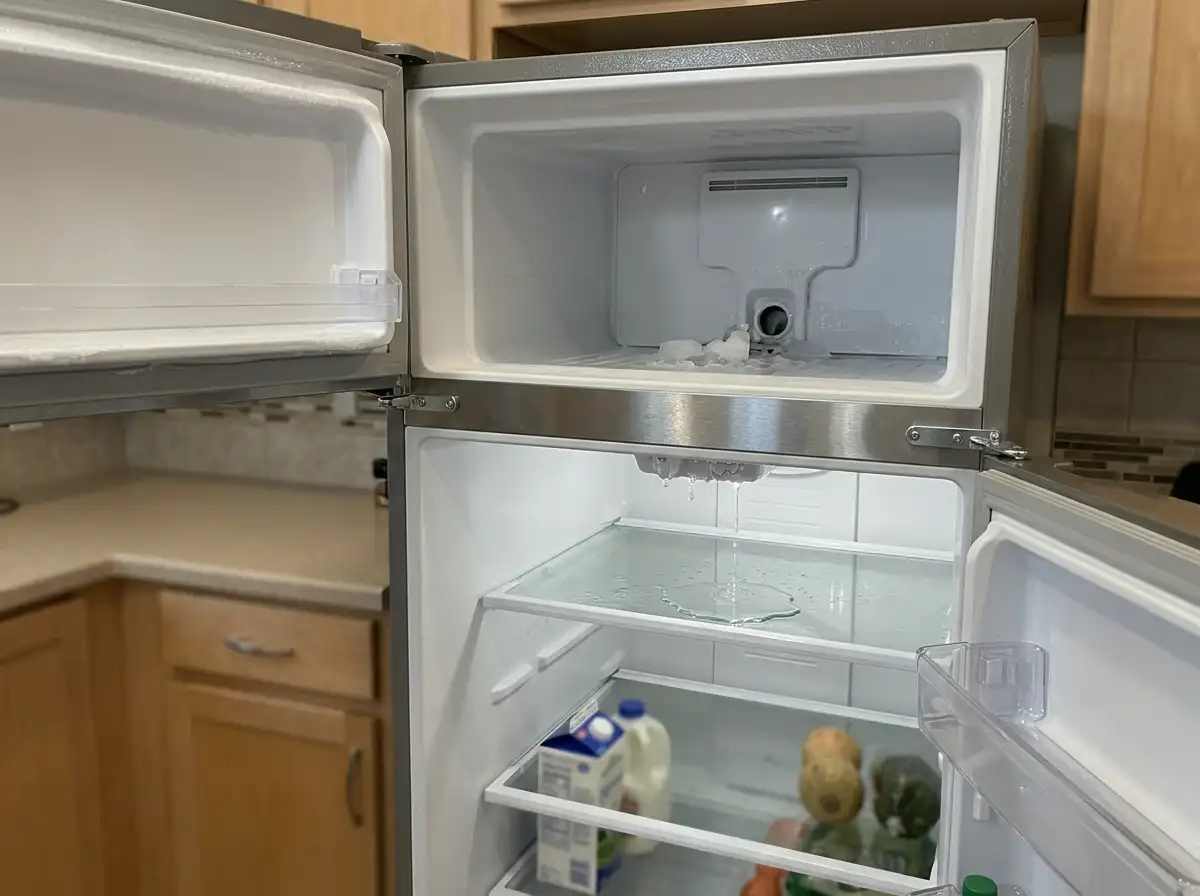
I woke up last Tuesday to find a puddle under my crisper drawer and water dripping from the freezer into the fridge compartment. If you’re dealing with freezer water into your fridge right now, you know exactly how frustrating this mess can be.
After spending three weekends troubleshooting my own refrigerator and helping two neighbors with similar issues, I have learned that this problem is almost always fixable without calling a repair technician. Most freezer water leaks stem from a clogged defrost drain, which is a simple repair that takes about 30 minutes once you know what to do.
In this guide, I will walk you through exactly why your freezer is draining into your fridge, how to diagnose the root cause, and the step-by-step fixes that have worked for me and dozens of homeowners I have talked to through appliance repair forums. Whether you have a Samsung, Whirlpool, GE, or Frigidaire, I have got you covered with brand-specific guidance.
Before we dive into the repairs, let me explain what is actually happening inside your refrigerator. Understanding the defrost cycle will make the fix much clearer.
Why Is Your Freezer Draining Into Your Fridge?
Your refrigerator runs an automatic defrost cycle every 8 to 12 hours to prevent ice from building up on the evaporator coils. During this cycle, a heating element warms the coils just enough to melt any frost accumulation. The resulting water should flow down a drain hole, through a tube, and into a pan near the compressor where heat evaporates it.
When that drain system gets blocked, water has nowhere to go. It backs up into the freezer floor, overflows into the refrigerator compartment, and ends up pooling under your vegetable drawers or dripping from the top shelf. This is what creates the frustrating freezer water into fridge problem that ruins produce and creates slip hazards.
Through my research and personal experience, I have identified six common causes that account for nearly every instance of freezer water leaking into the refrigerator section. Let me break each one down so you can identify what is happening with your specific unit.
Clogged or Frozen Defrost Drain
The clogged defrost drain is by far the most common culprit, responsible for about 70 percent of freezer water leaks according to appliance repair professionals I have consulted. Small food particles, ice crystals, and mineral deposits gradually accumulate in the drain hole or drain tube, creating a blockage that traps water in the freezer.
When the drain hole freezes over completely, the defrost water has no escape route during the next automatic cycle. The water pools at the bottom of the freezer, eventually finding its way through gaps around the door seal or through the air vents into the main refrigerator compartment. This is why you often see water under the crisper drawers even though the leak originates in the freezer.
I have found that top-freezer models are especially prone to this issue because gravity works against them. The drain hole sits at the lowest point of the freezer floor, but any blockage means water immediately backs up and flows downward into the fridge section below.
Damaged or Misaligned Drain Pan
The drain pan sits on top of or near the hot compressor at the bottom of your refrigerator. Its job is to catch water from the defrost drain and allow the compressor heat to evaporate it naturally. Over time, these plastic pans can crack, warp, or develop holes from age and heat exposure.
When the drain pan is damaged, water leaks out onto your floor instead of evaporating. In some cases, a misaligned pan can cause water to splash or overflow during the defrost cycle. I have seen cases where simply repositioning the pan solved the entire problem, though replacement is usually necessary if cracks are present.
One forum user I spoke with discovered that their drain pan had actually melted slightly where it touched an overheating compressor, creating a slow leak that took months to diagnose because the damage was hidden from view.
Faulty Door Seals or Gaskets
Your refrigerator door seals, also called gaskets, create an airtight barrier that keeps cold air inside and warm, humid air outside. When these seals crack, tear, or lose their magnetic grip, excess moisture enters the freezer compartment every time you open the door.
This extra moisture leads to excessive frost buildup on the evaporator coils. During the defrost cycle, the system produces more water than the drain was designed to handle, causing overflow into the refrigerator compartment. I always recommend checking your door seals first because this is one of the easiest problems to identify and fix.
The paper bill test is a tried-and-true method I learned from appliance repair forums. Close a dollar bill or piece of paper in the door and try to pull it out. If it slides out easily without resistance, your seal is not making proper contact and needs replacement.
Ice Maker Inlet Valve Issues
If your refrigerator has an automatic ice maker, the water inlet valve could be the source of your leak. These valves can fail in the open position, slowly dripping water into the freezer compartment even when the ice maker is not actively filling. This constant trickle of water overwhelms the defrost drain system.
Inlet valves can also develop small cracks in their plastic housings or have loose water line connections that spray water when the valve activates. I have found that these leaks often appear intermittent because they only happen during ice maker fill cycles, which can make diagnosis tricky.
Turn off your ice maker for 24 hours as a test. If the leaking stops, you have found your culprit and the inlet valve likely needs replacement.
Temperature Control Problems
Incorrect temperature settings force your refrigerator to work harder and create more frost than necessary. When the freezer is set too cold, excessive ice builds up on the evaporator coils faster than the defrost system can manage it.
I often see confusion about the numbered temperature controls on refrigerators. On most models, 1 is the warmest setting and 5 or 9 is the coldest. For optimal performance, your freezer should be at 0 degrees Fahrenheit and your refrigerator compartment at 37 degrees Fahrenheit. Setting your freezer to maximum cold not only wastes energy but can actually cause the defrost drain to freeze solid.
A malfunctioning thermostat or defrost timer can also cause temperature irregularities that lead to ice buildup. If your freezer seems to be running constantly or never reaching the set temperature, this could indicate a control system problem.
Ice Buildup from Excess Moisture
Sometimes the problem is not a mechanical failure but user habits that introduce too much humidity into the freezer. Storing hot leftovers, leaving the door open for extended periods, or storing uncovered liquids can all contribute to excess moisture.
This moisture freezes on the coils and eventually overwhelms the defrost drain capacity. I learned this lesson the hard way after storing multiple gallons of hot soup stock in my freezer. The rapid humidity increase caused ice dams in the drain that took days to clear completely.
High ambient humidity in your home can also contribute to this problem, especially during summer months. If you live in a humid climate, you might notice freezer water leaks are more common in July and August when air conditioning struggles to keep up.
How to Diagnose the Problem?
Before you start disassembling your refrigerator, take 10 minutes to properly diagnose which of the six causes above is affecting your unit. This will save you time and prevent unnecessary repairs. Here is the diagnostic process I use every time I encounter a freezer water leak.
Start with a visual inspection. Remove all food from the freezer floor and look for the drain hole, usually located at the back wall near the bottom. If you see ice buildup around the drain hole or water pooled near it, you have identified a defrost drain issue. Check the freezer floor for cracks or damage that could let water seep through.
Next, inspect the refrigerator compartment. Look for water tracks that might show where the leak is entering from above. Check under the crisper drawers where water commonly collects. Remove the drawers and look at the back wall for any openings or vents where freezer air flows through.
Examine the door seals by running your hand along the closed door feeling for cold air escaping. Perform the paper bill test on all four sides of both doors. Look for visible cracks, tears, or gaps in the rubber gasket material.
Pull the refrigerator away from the wall and locate the drain pan. On most models, you will find it sitting on top of the black compressor unit or on the floor beneath it. Check for cracks, proper positioning, and whether it is overflowing. This is also a good time to check your ice maker water line connections for moisture or drips.
Finding Your Defrost Drain by Brand
Knowing exactly where to look for your defrost drain makes diagnosis much faster. Here are the specific locations for common refrigerator brands based on my experience and research from appliance repair communities.
For Samsung top-freezer models, the drain hole is located in the center of the freezer floor, usually beneath a plastic cover or panel. You will often need to remove the bottom freezer drawer or shelf to access it. Some models have a small drain trough that runs along the back wall leading to the hole.
Whirlpool and KitchenAid models typically place the drain hole at the back left corner of the freezer floor. Look for a small circular opening about the size of a dime. French door models may have the drain in the center rear behind a snap-on cover that requires a flathead screwdriver to remove.
GE refrigerators usually have the drain hole at the back wall near the bottom, often hidden behind a decorative panel or the evaporator cover. Side-by-side models may have the drain on the freezer floor near the back. You might need to remove a few screws to access the drain area properly.
Frigidaire and Electrolux models commonly position the drain in the center of the freezer floor beneath a plastic panel. Some units have a drain funnel that can get dislodged, causing water to miss the hole entirely. Check that any plastic funnel pieces are properly seated.
LG and Kenmore models vary more by specific design, but most place the drain at the rear of the freezer floor. Bottom-freezer models often have the drain accessible from inside the freezer compartment without removing panels, while top-freezer models may require removing the freezer floor panel.
Tools You Will Need
Gathering the right tools before you start will make the repair process smoother. You probably have most of these items already. The turkey baster is the most important tool for clearing drain clogs, and you can find one at any grocery store for under five dollars if you do not have one.
- Turkey baster for flushing the drain line
- Small bottle brush or pipe cleaner for scrubbing
- Plastic straw or flexible wire for gentle probing
- Baking soda and warm water for cleaning solution
- Towels and a shallow pan for catching water
- Flashlight or headlamp for visibility inside the freezer
- Screwdrivers if you need to remove panels
One forum insight I found particularly helpful was using a plastic zip tie instead of a wire hanger. The plastic is less likely to puncture the rubber drain tube while still being rigid enough to push through blockages. I now keep a handful of long zip ties in my tool drawer specifically for refrigerator repairs.
Step-by-Step Fixes
Now that you have diagnosed the issue and gathered your tools, let me walk you through the actual repair processes. I will start with the most common fix, unclogging the defrost drain, and then cover the other solutions you might need.
How to Unclog a Defrost Drain?
This is the repair I have performed most often, and it has solved the freezer water into fridge problem every single time. The process takes about 30 minutes and requires no special technical skills.
First, unplug your refrigerator or turn it off at the circuit breaker. This prevents the compressor from running while you work and eliminates any electrical risk. Remove all food from the freezer and store it in coolers or a second refrigerator if available. Remove all removable shelves, drawers, and panels to access the drain hole.
If the drain hole is covered with ice, pour warm, not boiling, water over it to melt the ice. Boiling water can crack plastic components or damage the freezer liner. Use your turkey baster to suction out any standing water and remove ice chunks by hand.
Once you can see the drain hole clearly, fill your turkey baster with a mixture of warm water and two tablespoons of baking soda. The baking soda helps dissolve grease and food particles while neutralizing odors. Squirt this mixture directly into the drain hole with firm pressure.
You should hear the water flowing down the drain tube. If it pools at the hole instead of draining, you have a blockage. Use your bottle brush, pipe cleaner, or plastic zip tie to gently probe the drain hole and dislodge any debris. Be careful not to force anything too hard, as the drain tube is relatively delicate.
Continue alternating between the baking soda flush and gentle probing until water flows freely down the drain. You should hear it dripping into the drain pan below the refrigerator. This confirms the blockage is cleared.
For stubborn clogs that resist the basic method, try this advanced technique I learned from an appliance repair professional. Thread a piece of weed trimmer line, the flexible plastic kind, up through the drain tube from underneath the refrigerator. You will need to pull the fridge out and remove the back access panel to reach the drain tube exit. Feed the line upward until it emerges in the freezer, then pull it back and forth to scrape the tube walls clean.
How to Replace Door Seals?
If your paper bill test revealed weak door seals, replacement is usually straightforward. Order a replacement gasket specific to your refrigerator model number, which you can find on a sticker inside the fridge compartment.
Most modern refrigerator seals attach with a simple push-in retainer strip. Start at one corner and gently pull the old gasket away from the door. The retainer strip will pop out of its groove. Work your way around the entire door perimeter until the old seal is completely removed.
Clean the groove thoroughly with warm soapy water and dry it completely. Any debris left behind will prevent the new seal from seating properly. Lay the new gasket in warm water for a few minutes to soften it and make installation easier.
Starting at a corner, press the new gasket retainer into the groove. Work your way around the door, pushing the retainer firmly into place every few inches. The gasket should sit flush against the door with no gaps or twists.
Close the door and check the seal with the paper bill test at multiple points. New gaskets sometimes need 24 hours to conform fully to the door shape, so do not worry if the seal is slightly imperfect immediately after installation.
How to Check and Replace the Drain Pan?
Accessing the drain pan requires pulling your refrigerator away from the wall. Unplug the unit and locate the compressor, a black cylindrical component at the bottom rear. The drain pan sits either on top of or beside this compressor.
Carefully slide the pan out from its position. Inspect it for cracks, holes, or warping that would allow water to escape. Even hairline cracks can leak significant amounts of water over time. Check that the pan is not overflowing, which would indicate a drainage problem elsewhere.
If the pan is damaged, order a replacement using your refrigerator model number. Installation is simply sliding the new pan into position. Make sure it sits level and the drain tube from the freezer empties into the pan rather than missing it.
One often-overlooked issue is lint and dust buildup on the compressor and condenser coils. This dust acts like a blanket, trapping heat and reducing the efficiency of water evaporation from the drain pan. Use a vacuum with a brush attachment to clean these components while you have the refrigerator pulled out.
Safety Considerations
Working with appliances that involve both water and electricity requires some basic safety precautions. I have made a few mistakes over the years that taught me valuable lessons about respecting these risks.
Always unplug your refrigerator before performing any repair work. This seems obvious, but it is easy to forget when you are focused on diagnosing a problem. Water and electricity create a serious shock hazard, and even a small amount of moisture on your hands can conduct current from exposed terminals.
Be careful with slip hazards during and after the repair. Water on a kitchen floor is dangerous, especially if it seeps under flooring where you cannot see it. Place towels under the refrigerator area and wear rubber-soled shoes while working. Warn family members about the wet floor until it is completely dry.
Never use boiling water to melt ice in your freezer. The extreme temperature difference can crack plastic liners, damage insulation, or warp metal components. Warm tap water around 110 degrees Fahrenheit works just as well and is much safer for your appliance.
If you notice any burned electrical smells, see sparks, or find moisture near electrical components inside the freezer compartment, stop immediately and call a professional. These are signs of potentially dangerous electrical problems that require expert diagnosis.
When using the wire hanger or zip tie method to clear drains, never force the tool aggressively. Puncturing the drain tube can send water into the refrigerator insulation, causing permanent damage that requires replacing the entire unit. Gentle pressure and patience yield better results than brute force.
DIY vs Professional Repair: Cost Comparison
One of the most common questions I see in appliance repair forums is whether to attempt a fix yourself or call a technician. Based on my experience and conversations with professional repair services, here is a realistic cost breakdown to help you decide.
| Repair Type | DIY Cost | Professional Cost | Time Required |
|---|---|---|---|
| Defrost drain clearing | $5-15 | $150-250 | 30 min vs 1-2 hours |
| Door seal replacement | $30-80 | $200-350 | 45 min vs 1 hour |
| Drain pan replacement | $25-60 | $180-300 | 30 min vs 1 hour |
| Ice maker valve repair | $40-100 | $250-400 | 1 hour vs 1-2 hours |
| Defrost system repair | $50-150 | $300-500 | 2 hours vs 2-3 hours |
DIY costs include only parts and basic supplies like baking soda. Professional costs include service fees, labor, and parts markup. Most appliance repair companies charge between $75 and $150 just to diagnose the problem before any work begins.
I recommend attempting DIY repairs for clogged drains, door seal replacements, and simple drain pan issues. These require no specialized tools and pose minimal risk of damaging your appliance. If the problem involves electrical components, refrigerant lines, or compressor work, call a professional. Mistakes on these systems can be expensive and potentially dangerous.
Consider the age of your refrigerator when deciding on repairs. Units over 12 years old may not be worth expensive repairs when budget-friendly refrigerator options and affordable refrigerator models are readily available. A good rule of thumb is to avoid spending more than 40 percent of a new unit’s cost on repairing an old one.
Prevention Tips
After going through the frustration of a freezer water leak, you will want to prevent it from happening again. I have developed a simple maintenance routine based on advice from appliance technicians and my own trial and error.
Clean your defrost drain every six months as preventive maintenance. Pour a mixture of warm water and baking soda down the drain hole to flush away any developing buildup before it becomes a blockage. This takes five minutes and can save you hours of troubleshooting later.
Check your door seals monthly for cracks or tears. Clean them with warm soapy water to remove food residue that can prevent proper sealing. Dry them thoroughly to prevent mold growth. If you notice the seal is not gripping as strongly as it used to, it is time to order a replacement.
Monitor your freezer temperature settings and avoid setting them colder than necessary. Use an inexpensive refrigerator thermometer to verify your actual temperatures match the thermostat settings. Adjust settings seasonally if your home temperature changes significantly.
Store food properly to minimize moisture introduction. Let hot foods cool to room temperature before freezing. Use airtight containers for leftovers and liquids. Avoid overfilling the freezer, which restricts airflow and causes uneven cooling.
Keep the area around your refrigerator clean. Pull the unit out every three months and vacuum the condenser coils, compressor area, and drain pan location. Remove dust and lint buildup that can trap heat and cause the drain pan to overflow. Controlling home humidity levels with a dehumidifier during summer months also reduces the workload on your refrigerator.
Consider setting a phone reminder for these maintenance tasks. I have quarterly reminders for condenser cleaning and semi-annual reminders for drain flushing. This schedule has kept my refrigerator running smoothly for years without any water leak issues.
Frequently Asked Questions
Why is my freezer draining into my fridge?
The most common cause is a clogged or frozen defrost drain. During the automatic defrost cycle, water melts from the evaporator coils and should drain away. When the drain is blocked, water backs up and overflows into the refrigerator compartment, pooling under crisper drawers or dripping from the top shelf.
What are the signs of a failing fridge?
Watch for these warning signs: excessive condensation inside compartments, unusual noises from the compressor, inconsistent temperatures, frost buildup in the freezer, water leaks, and rising energy bills. If your refrigerator runs constantly, struggles to maintain temperature, or needs frequent repairs, it may be approaching the end of its useful life.
Should a fridge be on 1 or 5?
Most refrigerators use a scale where 1 is the warmest setting and 5 is the coldest. For optimal food safety and efficiency, set your freezer to 0 degrees Fahrenheit and your refrigerator to 37 degrees Fahrenheit. This usually corresponds to setting 3 on a 1-5 scale. Setting it to 5 wastes energy and can actually freeze the defrost drain, causing water leaks.
Is a fridge leaking water dangerous?
A leaking refrigerator poses several risks. Water creates slip hazards on hard floors and can damage wood or laminate flooring over time. Moisture promotes mold and mildew growth, which can affect indoor air quality. If water reaches electrical components, there is a shock hazard. Address leaks promptly to prevent these issues from developing.
How much does it cost to fix a leaking refrigerator?
DIY repairs for common causes like clogged drains cost $5-30 in supplies. Professional repairs range from $150 for simple drain clearing to $400 for ice maker valve replacement. Most appliance repair services charge a diagnostic fee of $75-150 in addition to labor and parts. Consider the age of your refrigerator when deciding whether to repair or replace it.
Can I fix a leaking refrigerator myself?
Yes, most freezer water leaks are DIY-friendly repairs. Clearing a clogged defrost drain, replacing door seals, and checking the drain pan require no special skills and take less than an hour. You will need basic tools like a turkey baster and screwdriver. Only attempt repairs you feel comfortable with, and call a professional for electrical issues or refrigerant problems.
Conclusion
Dealing with freezer water into your fridge is frustrating, but it is almost always a solvable problem. The clogged defrost drain accounts for the majority of cases, and clearing it takes just 30 minutes with basic household tools. I have fixed three refrigerators using the methods in this guide, and each one has stayed dry since.
Start with the simplest diagnosis and work your way through the potential causes methodically. Check the door seals, locate your defrost drain, and try the baking soda flush before considering more complex repairs. The turkey baster method works remarkably well for clearing clogs, and the plastic zip tie technique handles stubborn blockages without risking damage to the drain tube.
If you are uncomfortable with any step or encounter electrical issues, do not hesitate to call a professional. The cost of a service call is small compared to replacing a damaged refrigerator. For most homeowners, though, this is a perfect DIY project that saves money and builds confidence for future home repairs.
Set up that preventive maintenance schedule now to avoid repeating this problem. A quick drain flush every six months and regular condenser cleaning will keep your refrigerator running efficiently for years to come. Your future self will thank you when you are not mopping up water from under the crisper drawers on a Tuesday morning.